Extracurricular Member List
The Member List page is the control center for you as a Coach to determine which students are eligible to join the activities you lead. As a coach, you have full responsibility to review, approve, or reject student registrations that come through the mobile application.
[!NOTE] As a Coach, you are only responsible for members in the extracurricular activities you lead. You cannot see or process registrations for other activities led by other fellow teachers.
Registration & Approval Workflow
The new member recruitment process in eSchool follows an efficient digital workflow:
- Registration: Students select your extracurricular on their mobile app and click the "Register" button.
- Review: Student data enters the Coach dashboard system with a Pending status.
- Decision: You review the student's identity and decide to Approve or Reject.
- Notification: Students receive automatic notifications on their phones regarding the registration status.
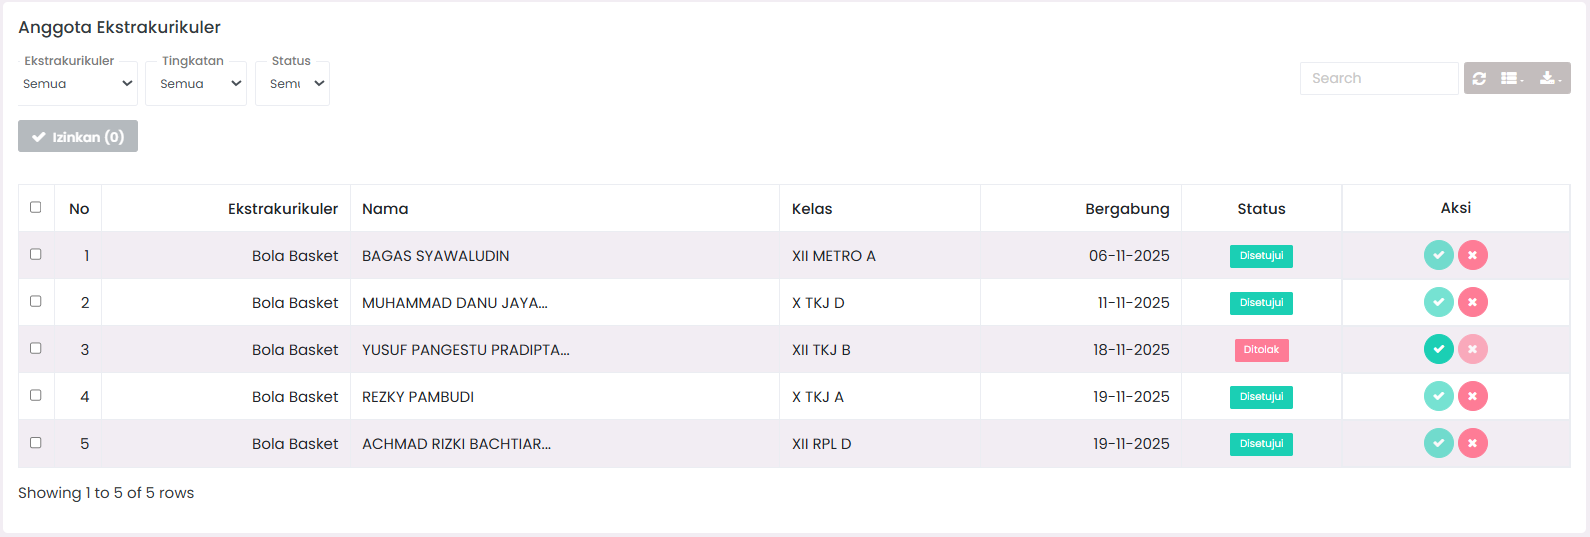
Understanding Member Status
Identify the status labels that appear on your member table:
- 🟡 Pending: The student has just registered and is waiting for your approval.
- 🟢 Approved: The student is officially a member. Only students with this status will appear in the meeting attendance list.
- 🔴 Rejected: The student is rejected from joining (possibly because the quota is full or they do not meet the criteria).
Managing Members
The Member page is equipped with search and filter features to make it easier for you to manage many students at once.
1. Filtering & Searching Members
You can narrow down the list that appears using:
- Select Extracurricular: (If you lead more than one activity).
- Grade Level: Filter students by class level (e.g., only grade 10).
- Status: Filter based on Pending, Approved, or Rejected.
- Search Column: Search for specific students using their full name or NISN.
2. Approving Registrants
A. Individual Method (One by one):
- Find the student name row with a Pending status.
- Click the Check (✓) button in the action column.
- Click "Yes" in the confirmation window that appears.
B. Bulk Method (Bulk Approve): Use this feature if there are many registrants at once at the beginning of the semester:
- Check the box to the left of the student names you want to approve.
- Click the blue Approve Selected Members button that appears above the table.
- All students you selected will be approved in one click. ⚡
3. Rejecting Registrants
If the registration is not suitable or the quota has been met:
- Click the red Cross (✗) button on the relevant student row.
- Once rejected, that student will not be able to participate in activity attendance.
Viewing Student Details
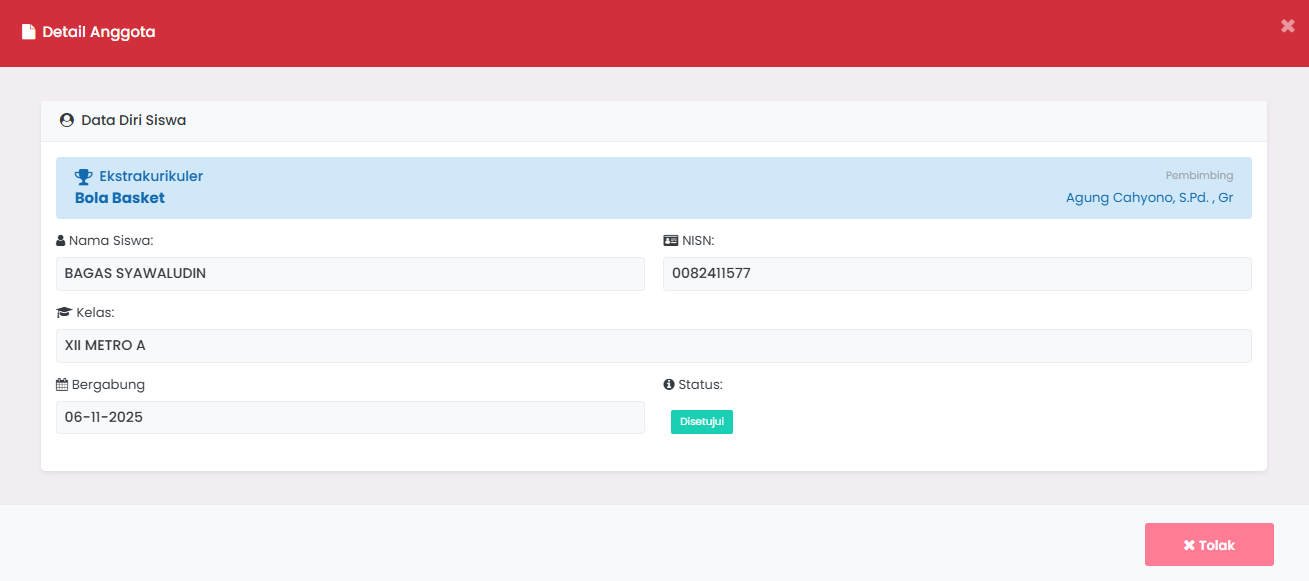
Before giving approval, you can view the student's full profile by clicking on the student's name row. A window (modal) will appear displaying:
- Student's profile photo.
- NISN and Class.
- The date the student submitted the registration.
- Quick action buttons (Approve/Reject) at the bottom of the detail window.
Exporting Member Data
If you need a list of member names in physical form or an Excel file for report purposes to the curriculum or student affairs side:
- Click the Export button.
- Select the desired file format (e.g., Excel).
- The file will be automatically downloaded with the name format:
rekap-anggota-[eskul-name]-[date].xlsx.
Best Practices for Coaches
- ✅ Routine Checks: Perform new registration checks at least every 2 days so students do not wait too long without certainty.
- ✅ Quota Communication: If your activity quota is limited, immediately change the status to
Rejectedfor registrants who do not fit the criteria so they can immediately register in other activities that are still available. - ✅ Class Validation: Ensure the students who register really come from the class level allowed to participate in the activity.
- ✅ Appreciation: Use this list to monitor student progress regularly and give appreciation to those who joined early with enthusiasm.
Troubleshooting
-
Student Claims to Have Registered but Does Not Appear? Ensure you are not activating the wrong filter (e.g., a different class filter). Ask students to ensure their registration was successful on the mobile app side.
-
Approve Button Cannot be Clicked? Ensure your internet connection is stable. If it still cannot, contact the School Admin to ensure the access rights (permission) of your coach account have been configured correctly.